How to Build Deck Stairs: A Step-by-Step Guide
How to Build Deck Stairs in Maryland: A Step-by-Step Guide
Building deck stairs can seem like a daunting project for many homeowners. However, with the right planning and tools, this can be an achievable DIY project that adds both function and value to your home. Whether you’re enhancing an existing deck or creating one from scratch, constructing safe, durable, and attractive deck stairs is essential. In this step-by-step deck stairs guide, you’ll learn the basics of DIY deck stairs construction, tailored for the climate and conditions typical of Maryland. By following this guide, you’ll understand how to make deck stairs that stand up to the elements while improving the aesthetics of your outdoor space.
Step 1: Plan and Measure
Before you begin any construction, it’s essential to have a solid plan in place. Proper planning involves understanding the layout of your deck and where you want to position the stairs. This will make the process smoother and more accurate. Here’s what you need to focus on in the planning stage:
Determining the Stair Location
The location of your stairs will depend on the size of your deck and its overall design. You’ll want to ensure the stairs are convenient for accessing your backyard or another area of your property. Additionally, consider traffic flow and how the stairs integrate with your existing deck.
Measure the Deck Height
Next, you’ll need to determine the height of the deck from the ground, as this will impact how many steps you need to build. Use a tape measure to accurately measure from the deck surface down to the ground at the intended stair location.
Calculate the Number of Steps
To calculate the number of steps, you’ll use the rise-to-run ratio. Typically, you’ll aim for a rise (the height of each step) of 6 to 7.5 inches and a run (the depth of each tread) of 10 to 12 inches. For example, if your deck is 36 inches off the ground and you plan a 7-inch rise, you’ll need five steps (36 ÷ 7 = 5.14, rounded to five).
Once you have these measurements, you can plan the stair stringers, which are the supports that run beneath the stairs.
Step 2: Gather the Proper Tools and Materials
After planning, it’s time to gather the right materials and tools to execute your project. Here’s a list of the basic tools and materials you’ll need for this deck stair construction in Maryland:
Tools:
- Measuring tape
- Carpenter’s square
- Circular saw or miter saw
- Drill
- Level
- Safety glasses
- Speed square
- Hammer
- Wood screws or nails
Materials:
- Pressure-treated wood for stringers and treads
- Gravel or concrete for the base
- Stair risers (optional)
- Deck screws or nails
- Handrails (if required by code)
Make sure to use weather-resistant materials, especially for projects in Maryland, where exposure to rain, snow, and humidity can wear down the stairs over time. Pressure-treated wood is ideal because it is durable and resistant to rot and insects.
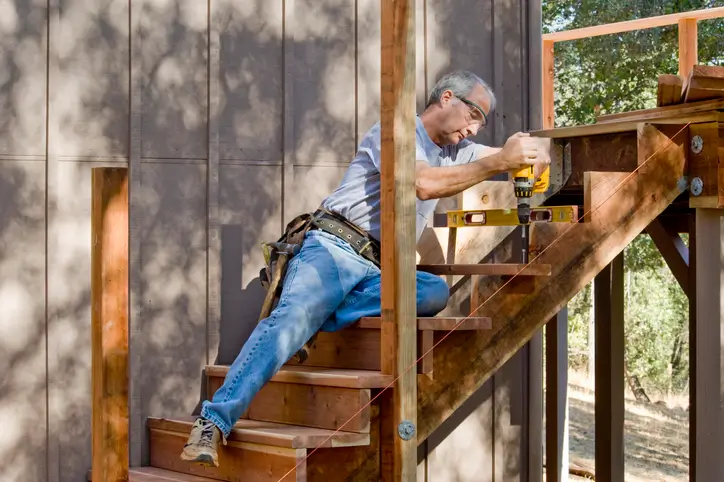
Step 3: Cut the Stringers
The stringers are the backbone of your deck stair construction. They support the treads and risers and need to be cut precisely for the stairs to be both level and safe.
Mark the Stringers
Using your previously calculated rise and run, mark the measurements on the stringer boards. A framing square will be your best friend here. Use it to draw out the step pattern on the board, keeping each rise and run consistent.
Cut the Stringers
Once you’ve marked the stringers, use a circular saw to make the cuts along the lines. Be careful not to overcut, as this could weaken the structural integrity of the stringers. Use a handsaw for any fine adjustments. For most decks, you’ll need at least three stringers to provide adequate support for the treads.
Install the Stringers
Attach the top of the stringers to the deck frame using brackets or hangers, depending on your deck’s structure. The bottom of the stringers should rest on a solid base, such as gravel or concrete pads, to prevent sinking and ensure long-term stability.
Step 4: Attach the Treads and Risers
With the stringers in place, you can now move on to attaching the treads and risers. Treads are the flat part of the stairs that you step on, while risers are the vertical pieces that connect each step.
Install the Risers
Although not always required, risers give the stairs a more polished look and provide additional support. Attach the risers to the stringers using weather-resistant screws or nails. Make sure they’re level and evenly spaced for a professional appearance.
Install the Treads
Now that the risers are secured, you can attach the treads. The treads should overhang the risers slightly for a comfortable walking surface. Make sure each tread is level and securely fastened. Depending on your local building codes, you may also need to add nosing (the rounded edge on the front of the tread) for additional safety.
Step 5: Build the Stair Landing
For safety and code compliance, a sturdy landing is essential at the bottom of your stairs. Maryland building codes usually require that any deck stair landing be made from materials like concrete or pavers to ensure stability.
Install the Base
Prepare the base by digging out the area beneath the stair landing and filling it with gravel for proper drainage. Compact the gravel and place either concrete or a prepared landing pad.
Attach the Landing
Once the landing base is ready, attach the bottom of the stringers to the landing securely, ensuring that everything is level and solid. The stringers should sit flush with the landing to avoid any trip hazards.
Step 6: Install Handrails (If Required)
Building codes in many areas, including Maryland, require handrails for stairs with more than three steps. Handrails provide safety and enhance the look of your deck stairs.
Measure and Attach the Handrails
Measure the height of the handrails from the treads and cut the railings to size. The standard height is between 34 and 38 inches. Attach the railings to the posts using screws, ensuring that they are secure and can support weight. Double-check that the handrail height meets local code requirements.
Step 7: Finishing Touches
Now that your stairs are built, it’s time to add some final touches. Sand any rough edges on the treads or risers to prevent splinters. You can also apply a stain or sealant to the wood to protect it from the elements and enhance its appearance.
For those living in Maryland, choose finishes that can withstand humid summers and cold winters. A high-quality, UV-resistant sealant can prevent the wood from fading or warping due to sun exposure.
Get Help With Your New Deck From Five Star Deck Service in Maryland
Building deck stairs can be a rewarding DIY project, but if you’re looking for professional expertise or simply want to ensure the job is done right, Five Star Deck Service is here to help. With our extensive experience in deck restoration, remodeling, and repair, we provide custom solutions to meet your outdoor needs. From deck stair construction to full deck renovations, trust our dedicated team to deliver exceptional results that are both beautiful and durable. Contact us today for a complimentary consultation and estimate and let us bring your outdoor vision to life!